Peach Hand Pies 1

Peaches are one of those summer treats that I’m always sad to see disappear in the fall. As a child, I remember going to peach orchards and picking bushels of them, and eating them straight off the tree. A ripe peach warm from the sun is one of those memories that stay with you. While a traditional peach pie is always a good choice, these smaller hand pies make snacking much easier. They also travel well, as my colleagues can attest!
While hand pies are usually fried, I’ve found that using an all butter crust that’s treated like a laminated dough (think puff pastry), and baking the pies, leads them to be lighter. For this recipe I used my go-to pie dough, Rich Butter Short Dough, with the addition of a bit of sugar. The peaches will need varying amounts of sugar depending on their sweetness starting out. The addition of some warm spices and a touch of ground Tapioca for thickening make the filling just right.
Peach Hand Pies
- 4 cups Peaches (fresh or frozen)
- 1/2 – 1 cup sugar (depends on how sweet your peaches are)
- 1/4 tsp. salt (table)
- 1 1/2 Tbsp. ground Tapioca
- 3 Tbsp. butter
- 1 pinch nutmeg (ground)
- 1 tsp. vanilla extract
- 1 egg (beaten with 1 Tbsp. of water)
- 1/2 cup water
Prepare the Pie Dough
- See recipe below
Prepare the Filling
- Place peaches in medium saucepan. Add 1/2 cup of sugar, salt and ground Tapioca. Mix together and let sit 10 minutes to so that Tapioca starts to absorb the peach juices.

- Cook over medium heat until peaches start to break down, about 20 minutes. Use a potato masher to break up filling a bit, but leave some larger pieces as well. Reduce heat to medium-low and add butter. Taste for sweetness and add remaining sugar to taste. Continue to cook until filling is thick and bubbly, about 10 more minutes.
- Remove from heat. Stir in nutmeg and vanilla and let cool to room temp. Filling can be placed in the fridge for up to 3 days before using.
Prepare crusts
- Place baking parchment on 2 1/2 sheet pans
- Remove dough from refrigerator. Divide in half and place one half on lightly floured work surface. Roll out to approximately 1/8 inch thickness. Fold dough in half lengthwise and then again crosswise. Roll out again to 1/8 in thickness. This folding is called laminating and is similar to the process used to make puff pastry. This will help your dough puff up when baked.
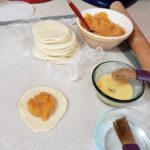
Use a 4 in. round cutter and cut as many circles of dough as you can from this half of dough. Put the scraps aside and repeat with remaining half of dough.
Gather scraps from both halves of dough and re-roll them and cut more circles.
Assemble Hand Pies
- Take one dough round. Place about 4 tsp. filling in center of round. Brush edges of round with water and fold over. Press edges to seal, then use a fork dipped in flour to crimp the edges. Don’t be shy here, you want a good seal without cutting through the dough. Set each completed pie on parchment lined baking sheet.
Once all rounds have been filled and crimped, place in freezer for 30 minutes. Preheat oven to 400 degrees while pies chill.
Bake
- Brush each hand pie with beaten egg. This will give your pies a beautiful golden finish.
Bake hand pies for 20-35 minutes (depending on your oven), until golden brown. Place on cooling rack and let cool to room temp.
Rich Butter Short Dough
This is my go-to pie/pastry dough. It’s a short dough, which refers to it’s high fat to flour ratio. This produces a very tender crust with tons of flavor.
- 2 cups flour (all purpose, plus more for work surface)
- 1/2 tsp. salt (table)
- 1 cup butter (salted)
- 1/2 cup ice cold water
Optional
- 1-2 Tbsp. sugar (white, granulated)
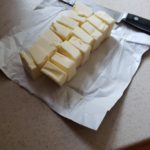
- Cut cold butter into cubes.
- Add flour and salt to mixer bowl. With paddle attachment, mix on lowest setting for a few seconds.
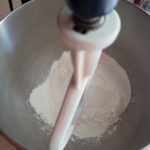
- Add butter cubes one at a time, mixing for about 10 seconds before adding next cube.

- With the mixer running (still at lowest speed), sprinkle 3-4 Tbsp. of the cold water over the flour/butter mixture. Once incorporated, stop mixer and dump dough onto your lightly floured work surface. It will be shaggy and not wet enough, but that’s ok, you’ll be incorporating the remaining water by hand.
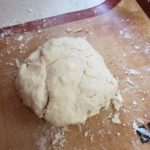
- Sprinkle 2 of the remaining Tbsp. of water over the flour/butter mixture and start gently kneading it into the dough. You’re looking for the dough come together, but not be wet, so use as little of the remaining water as possible. You will still see large pieces of butter, which is a good thing. Those will melt and release steam which makes your crust flaky. Once the dough comes together, wrap in plastic wrap and refrigerate for at least an hour so it can rest and the moisture can redistribute throughout.
- Once chilling time is complete, roll dough as directed by recipe.
If making a sweeter dough, add 1-2 Tbsp. of white granulated sugar to flour and salt at beginning of recipe. This option is great if making a dessert with a tart filling.